
Drip Edge Installation: Eave vs. Rake
In standard drip edge installation, metal flashing goes under the membrane at eaves and over underlayment at rakes, with its lower leg set off the fascia.
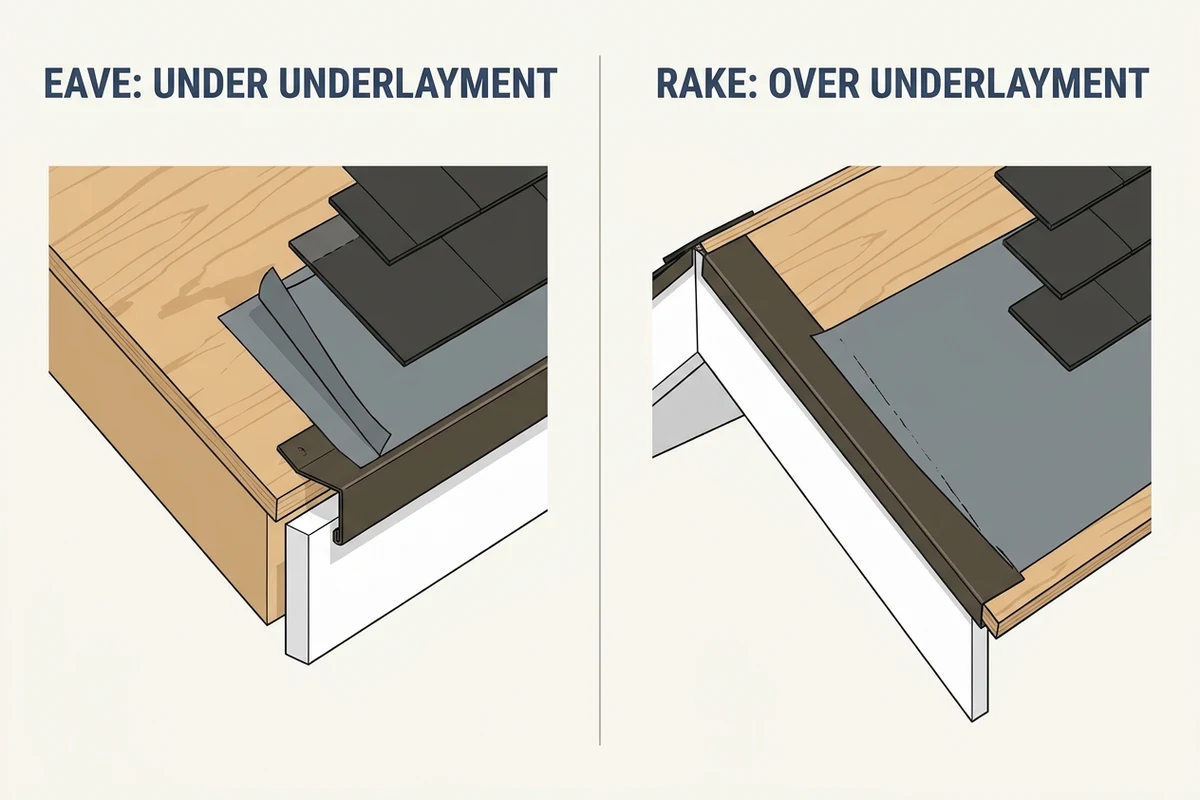
Standard shingle-fashion drip edge installation places metal flashing on the clean roof deck under the self-adhering membrane at eaves and over the underlayment along gable rakes, with its lower leg set away from the fascia. In high-wind zones, eave drip edge can go over a fully adhered membrane if flashing cement seals the upper edge.
Coordinating roof drip edge with membranes, underlayment, starter strips, and gutters keeps water draining off the roof perimeter instead of wicking behind trim boards or saturating sheathing edges. Review these perimeter layer transitions alongside the exterior siding and roofing guide so roof drainage planes connect cleanly with fascia, soffit, and wall water-control layers.
| Roof Edge Condition | Drip Edge Position Relative to Underlayment | Key Overlap and Fastening Rules | Edge Seal and Fascia Detail |
|---|---|---|---|
| Standard eave with self-adhering membrane | Installed first on the clean roof deck beneath the self-sealing bituminous membrane and underlayment | Membrane sections along long eaves overlap 6 inches shingle-fashion; asphalt starter strip overhangs 1/4 to 3/4 inches past drip edge | Lower edge of membrane covers top edge of metal drip edge; lower leg of drip edge is set away from fascia |
| Standard gable rake | Installed after roofing underlayment so rake drip edge sits on top of the underlayment | Rake starter strip overhangs 1/4 to 3/4 inches past drip edge and overlaps 3 inches with eave starter strip | Upper rake flashing laps shingle-fashion over lower eave flashing; lower leg is set away from fascia trim |
| High-wind eave and rake over sealed deck | Installed over the fully adhered membrane underlayment or taped-seam underlayment at all eaves and rakes | Minimum 2 inches deck overlap, 1/2 inch extension below sheathing, 3 inches joint overlap, and 4 inches maximum fastener spacing | Eave upper flange edge sealed with flashing cement or covered by an ASTM D1970 peel-and-stick starter strip; 1/4 inch maximum eave overhang |
| Metal roof eave and rake | Installed at eaves and rakes after 4-inch-wide deck seam tape and #30 felt or synthetic underlayment (or two-layer #30 felt) | Adjacent flashing sections require at least a 4-inch end lap with matching or chemically compatible fasteners and accessories | Sealant applied between metal roof and drip edge; smooth-finish eave closure clips allow water flow into the gutter |
How Does Drip Edge Installation Differ on Eaves and Rakes?
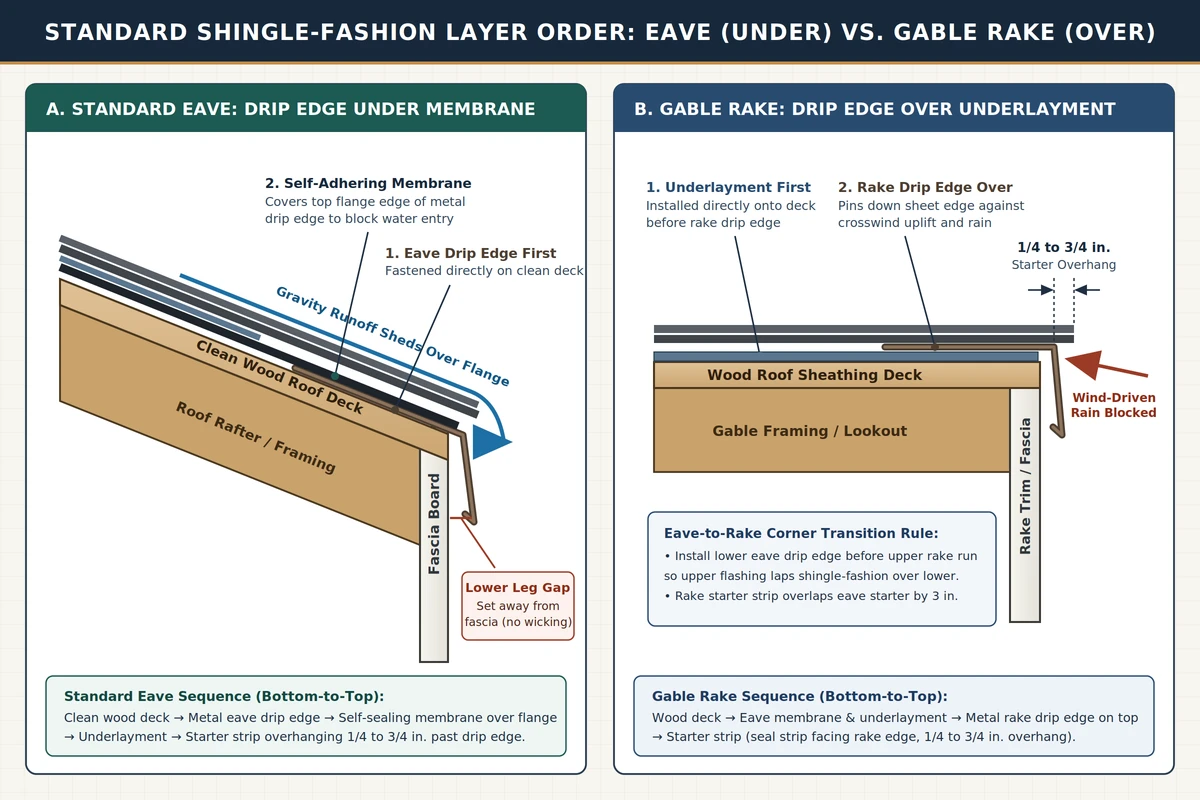
At roof eaves, standard installation places metal drip edge directly on the clean wood deck beneath the self-adhering membrane and underlayment so upslope runoff sheds out over the metal flange, whereas along gable rakes the underlayment goes down first and the rake drip edge sits on top to block wind-blown rain.
Water moves differently at the horizontal bottom edge of a sloped roof than it does along a sloped gable perimeter. In the U.S. DOE Building America guide on cold-climate roof eaves, standard shingle-fashion construction sequences layers from the lowest edge upward so each upper sheet laps over the piece below it. Properly installed metal drip edge protects both the top of the fascia board and the exposed edge of the roof deck from rainwater, wind-blown rain, wildfire embers, and insects, whereas omitting metal drip edge and letting asphalt shingles hang down unsupported too far past the deck edge leaves the roof perimeter vulnerable to wind damage and moisture entry.
Eave Deck Preparation, Membrane Overlap, and Fascia Clearance
Before fastening eave drip edge and applying a self-adhering membrane, the roof deck—typically plywood—from the edge of the eaves to at least two feet up the roof deck from the interior plane of the exterior wall should be cleaned of loose nails, wires, debris, dust, oil, and water so the membrane adheres properly. Installers then fasten the eave drip edge directly onto the clean deck, measure the eave run, and apply the self-sealing bituminous membrane over the eave drip edge so the lower edge of the membrane covers the top edge of the metal drip edge. Extending the self-sealing bituminous membrane over the metal drip edge ensures that water draining beneath the primary roof covering cannot find access behind the flashing at the very edge of the eave. On very long eaves, cutting the membrane into shorter lengths and working from the lower point upward with 6 inches of shingle-like overlap between sections keeps courses flat and aligned.
Equally critical at the eave is the position of the vertical lower leg against the trim board. As documented in PNNL Building America Solution Center fascia clearance guidance, installers should not install drip edge flashing with the lower leg touching the fascia, because contact can encourage wicking of water behind the flashing; instead, set the lower leg of the drip edge away from the fascia so water breaks free cleanly at the hem.
Gable Rake Capping and Eave-to-Rake Corner Transitions
Along gable rakes, water drains parallel to the roof edge while crosswinds push rain laterally toward the exposed edge of the underlayment. Installing roofing underlayment directly over the eave membrane first and then placing the rake drip edge on top of the underlayment pins the sheet edge down and prevents sideways rain from blowing underneath the felt or synthetic layer.
Where the gable rake meets the eave at the bottom corner, shingle-fashion lapping governs both the metal flashing and the shingle starter course. Installing the lower eave drip edge before the sloped rake run allows the upper rake trim to lap over the eave flashing so runoff cannot drain behind the lower piece, and on standard asphalt shingle roofs the starter strip at the rake should overlap 3 inches with the starter strip at the eave.
Does Drip Edge Go Over or Under Roof Underlayment?
Roof drip edge goes under the underlayment at standard eaves and over the underlayment at gable rakes, except in high-wind assemblies where builders install metal drip edge over a sealed roof deck at both eaves and rakes and seal the upper eave flange edge with compatible flashing cement.
Why do building-science manuals show two valid eave assemblies? The answer depends on whether gravity drainage alone governs the roof edge or whether hurricane and storm uplift resistance requires clamping the perimeter of a sealed roof deck. Even small breaches at the roof edge during a severe storm can admit wind-driven water into the attic and living space. According to U.S. DOE Building Science Education guidance on drip edge at roof eaves and rakes and the Building America guide to roof deck sheathing and sealing for sloped roofs, strengthening a sloped roof in storm-prone regions pairs two steps: first sealing the roof deck, and second locking the perimeter in by installing metal drip edge over the underlayment at all eaves and rakes.
Standard Perimeter Sequencing vs. High-Wind Sealed-Deck Lock-In
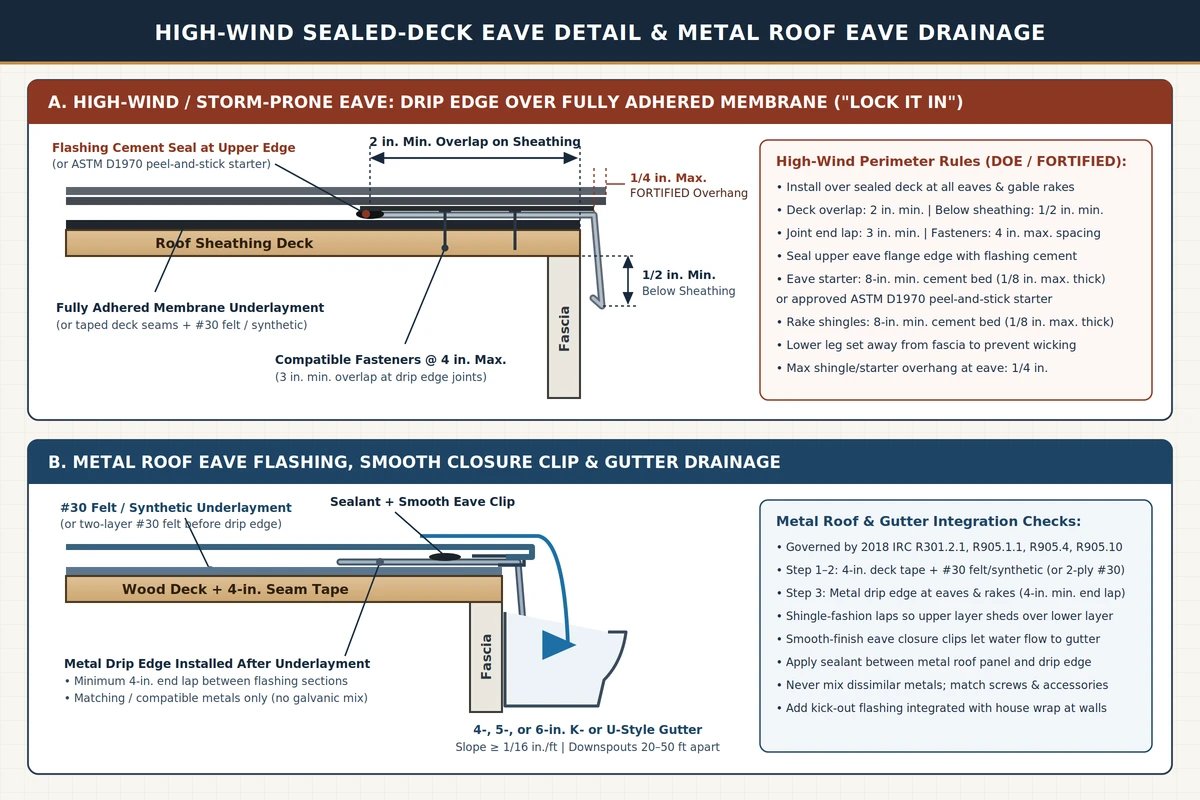
When a high-wind roof deck is sealed by taping horizontal and vertical sheathing panel joints with approved self-adhering flashing tape rather than applying a full-deck membrane, the taped deck is covered with code-compliant ASTM D226 Type II (#30) or ASTM D4869 Type III or Type IV (#30) building felt or an approved synthetic underlayment before the perimeter drip edge is fastened on top. Installing code-compliant metal drip edges over the membrane or underlayment at all eaves and gable rakes clamps that perimeter sheet against wind uplift.
Under high-wind guidance, metal drip edges should extend a minimum of 1/2 inch below the sheathing, overlap the top of the roof sheathing edge a minimum of 2 inches, and overlap a minimum of 3 inches at joints. They should be mechanically fastened to the roof deck at a maximum spacing of 4 inches using fasteners that are compatible with the metal flashing, and at eaves flashing cement should be used to seal the edges. For broader roof-to-wall uplift load paths and storm detailing, compare the high-wind roof systems guide.
Starter Strip Overhang and High-Wind Flashing Cement Bedding
Once the perimeter drip edge and underlayment are in place, starter strip alignment controls how water leaves the shingle edge and how wind uplift acts on the first shingle course. In the Building America guide for asphalt shingle roofs, standard asphalt shingle starter strips are installed with the self-adhesive seal strip facing up and positioned toward the eave edge (or toward the rake edge along rakes) so the adhesive bonds to the shingle course above. Standard starter strips should overhang 1/4 to 3/4 inches past the drip edge for drainage and be nailed 2 to 3 inches up from the bottom of the eave.
High-wind specifications tighten that overhang and add continuous adhesive bedding when drip edge sits over the underlayment:
| Assembly Detail | Standard Asphalt Shingle Roof Rule | High-Wind Sealed-Deck Rule (Drip Edge Over Underlayment) |
|---|---|---|
| Eave drip edge layer position | Directly on clean wood deck beneath self-adhering membrane and underlayment | Over fully adhered membrane or taped-deck #30 felt / synthetic underlayment |
| Rake drip edge layer position | Over roofing underlayment along gable rake | Over fully adhered membrane or underlayment along gable rake |
| Deck flange, joint lap, and fastening | Shingle-fashion corner lap with lower leg set away from fascia | 2 inches minimum deck overlap, 1/2 inch minimum below sheathing, 3 inches minimum joint overlap, 4 inches maximum compatible fastener spacing |
| Eave starter strip bedding | Self-adhesive seal strip facing up toward eave edge, nailed 2 to 3 inches up from eave bottom | Set in a minimum 8-in.-wide strip of compatible flashing cement (maximum 1/8 in. thick), or use an approved ASTM D1970 peel-and-stick starter strip covering the drip edge top surface |
| Rake shingle or starter bedding | Self-adhesive seal strip facing rake edge; 3 inches overlap with eave starter strip | Shingles at rakes set in a minimum 8-inch-wide strip of compatible flashing cement (maximum 1/8 in. thick) |
| Shingle and starter overhang past drip edge | 1/4 to 3/4 inches past the drip edge for drainage | Must not extend more than 1/4 in. beyond the drip edge at eaves |
Does Drip Edge Go Over or Under Ice and Water Shield?
In standard cold-climate eave assemblies, metal drip edge installs directly on the clean wood deck under the self-adhering bituminous ice-dam membrane, whereas high-wind assemblies that place eave drip edge over a fully adhered membrane require compatible flashing cement along the upper flange edge or an approved ASTM D1970 peel-and-stick starter strip.
Self-adhering polymer-modified bituminous membranes—commonly called ice and water shield—protect eaves where snow melt can refreeze and back water up under shingles. When builders follow standard cold-climate eave sequencing, placing the metal drip edge on the cleaned plywood deck first and extending the self-sealing bituminous membrane over the top flange edge creates an uninterrupted downward drainage plane. Any meltwater that reaches the membrane surface runs straight over the metal nose without encountering an upward-facing metal lip. For model-code climate triggers, eave measurement rules, and valley membrane laps, consult the ice and water shield eave and valley code guide.
When a project instead follows high-wind sealed-deck sequencing and installs metal drip edge on top of a fully adhered roof membrane at the eaves, leaving the upper edge of the metal flange unsealed would allow backed-up water on the membrane to seep beneath the flange. Building America details resolve that joint in two ways: installers either apply compatible flashing cement to seal the upper edge of the eave drip edge flashing (paired with eave starter strips set in a minimum 8-in.-wide bed of compatible flashing cement no thicker than 1/8 inch), or install a shingle manufacturer-approved ASTM D1970 fully adhered peel-and-stick starter strip with an asphaltic adhesive strip at the eave so the starter strip adheres directly to and covers the top surface of the drip edge. Along gable rakes, drip edges are installed directly over the fully adhered membrane underlayment without creating an upslope dam.
How Do You Install Drip Edge With Gutters?
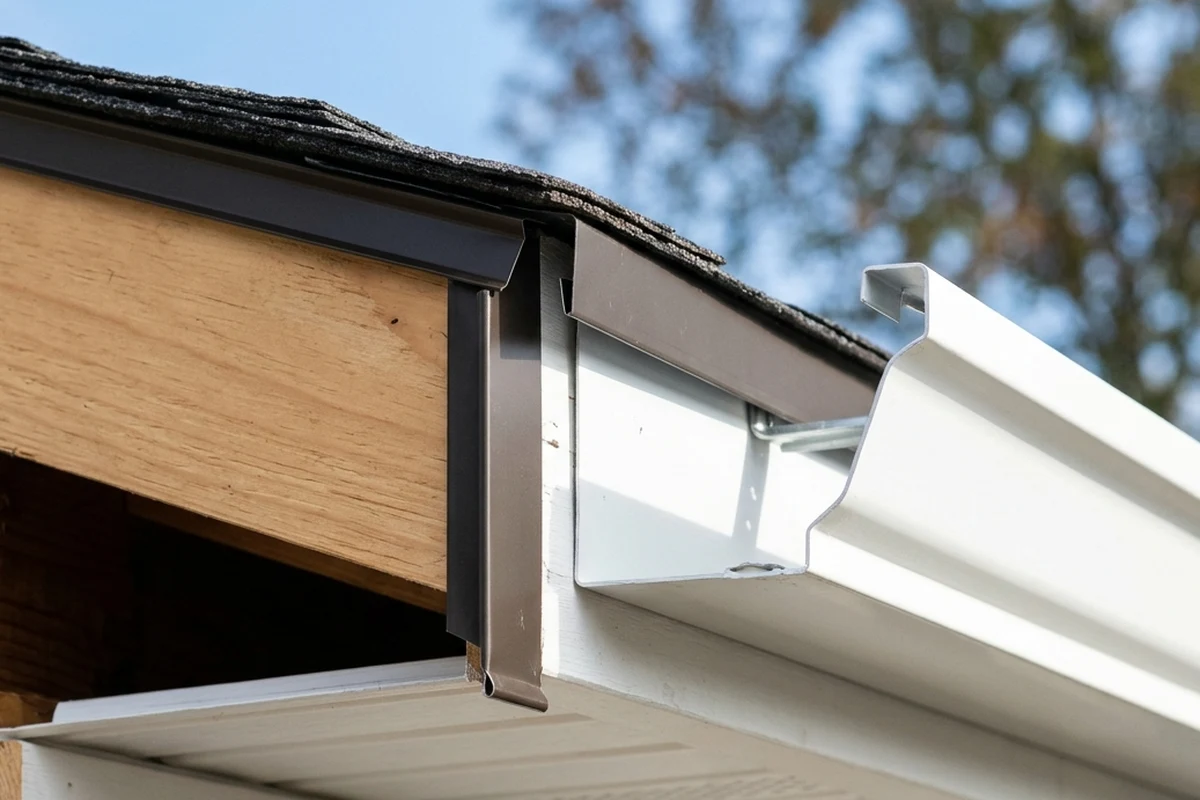
To install drip edge with gutters, verify whether the gutter has an integral flashing flange or requires a stand-alone metal drip edge, tuck the rear wall of the 4-, 5-, or 6-inch gutter behind the vertical leg of the drip edge, set the lower leg away from the fascia, and slope gutters 1/16 inch per foot.
The junction between the roof sheathing edge, the top of the fascia board, and the back of the eave gutter is one of the most frequent rot locations on residential exteriors. According to the Building America resource guide on gutters and downspouts, installers should first inspect the roof edge to check whether a metal drip edge is already present or formed as an integral flashing piece on the metal gutter. Where no drip edge or integral flange exists, installing a metal drip edge closes the gap that can exist between the edge of the roof sheathing and the top of the fascia, protecting the sheathing and fascia from water, insects, and flames if wind-blown embers ignite gutter debris.
Mounting the back wall of a residential 4-, 5-, or 6-inch K-style (ogee) or U-style (half-round) gutter behind the vertical leg of the eave drip edge ensures that water shedding off the shingles and underlayment drops into the trough rather than slipping behind the gutter onto the fascia. Even behind a gutter, keep the lower leg of the drip edge set away from the fascia board so water does not wick upward by capillary action behind the metal.
To prevent standing water and overflow along the eave, slope gutters at least 1/16 inch per foot of run toward downspouts, allow 1 square inch of downspout cross-section for every 100 square feet of roof area, and place downspouts at least 20 feet apart and no more than 50 feet apart. In heavy-rainfall climates where concentrated runoff can overwhelm gutter capacity where a sloped roof eave terminates against a vertical sidewall, integrate a kick-out diverter flashing with the wall house wrap so water enters the gutter instead of wetting the cladding; see the building-envelope guide for coordinating roof-to-wall water-resistive barriers.
Can You Retrofit Drip Edge on an Existing Roof?
When an existing roof lacks metal drip edge or an integral gutter flashing flange at an exposed sheathing-to-fascia gap, installers can add metal drip edge along the eave, although complete roof tear-off during re-roofing remains the reliable stage to replace rotted decking, seal roof seams, and sequence eave and rake flashings properly.
Older roofs sometimes have asphalt shingles hanging unsupported past the deck edge with no metal drip edge visible, exposing the sheathing edge and fascia top to rainwater, wind uplift, insects, and wind-blown embers. During gutter replacement or wildfire-hardening inspections, DOE gutter guidance directs contractors to inspect the roof edge and install a metal drip edge if neither a stand-alone drip edge nor an integral gutter flashing piece is present, shielding the gap between the roof sheathing and the top of the fascia.
However, slipping trim beneath existing shingles cannot correct concealed deck decay, missing eave membranes, or unsealed sheathing joints further upslope. Both the Building America sloped-roof deck sealing guide and the Building America metal roofs resource guide emphasize taking advantage of re-roofing by removing all existing roof coverings and flashings down to the deck, cleaning away debris, inspecting and replacing damaged or rotted sheathing, framing, and flashing, and ensuring that new underlayment, eave protection, and perimeter drip edges are adequately nailed and sequenced in shingle fashion before new coverings go on.
How Does Drip Edge Installation Work on a Metal Roof?
On metal roofs governed by 2018 IRC R301.2.1, R905.1.1, R905.4, and R905.10, installers tape roof deck seams with nominal 4-inch-wide flashing tape and lay #30 felt or synthetic underlayment (or two-layer #30 felt) first, then install compatible metal drip edge at eaves and rakes with 4-inch minimum end laps and smooth eave closure clips.
Metal shingle and standing-seam panel perimeters rely on coordinated deck sealing, corrosion-compatible flashings, and unobstructed eave drainage. The International Residential Code specifies minimum requirements for design wind loads (2018 IRC R301.2.1), metal roofing underlayment (R905.1.1), metal roof shingles (R905.4), and metal roof panels (R905.10), covering deck and slope criteria, material standards and thickness, corrosion resistance, and attachment. For a broader look at panel profiles, concealed clips, and shingle comparisons, review the standing-seam metal roof vs. shingles guide.
In the DOE Building America installation sequence for metal roofs over wood decking, installers either apply a nominal 4-inch-wide roof deck flashing tape over all sheathing panel seams and cover the deck with #30 felt or equivalent synthetic underlayment, or install a two-layer #30 felt underlayment system, and then install metal drip edge at both eaves and rakes in Step 3. Every panel and perimeter trim piece is lapped shingle-fashion so the upper layer sheds water over the lower layer without draining behind it, and adjacent sections of metal flashing should have an end lap of at least 4 inches.
At the eave line, installers apply sealant between the metal roof and the drip edge and mount smooth-finish eave closure clips that secure the hemmed lower panel edge while allowing water to flow freely into the gutter. Finally, to prevent galvanic corrosion, contractors must not use dissimilar metals on the roof: drip edge, eave clips, screws, and metal accessories must match or be chemically compatible with the metal roofing panel.
What Belongs on an Eave vs. Rake Drip Edge & Gutter Integration Checklist?
Before starter strips, shingles, or metal panels conceal the roof perimeter, verify deck cleaning, eave-under versus rake-over or sealed-deck high-wind layer order, lower-leg clearance off the fascia, starter overhang limits, gutter apron placement and 1/16 inch per foot slope, and fastener metal compatibility across every eave, rake, and roof-to-wall corner.
Use the field verification table below during pre-cover roof inspections and contractor scope reviews:
| Inspection Checkpoint | What to Verify on the Roof Edge | Governing Specification or Threshold |
|---|---|---|
| Eave deck preparation | Confirm plywood or wood deck is clean before installing eave drip edge and self-adhering membrane | Clean from eave edge to at least two feet inside the exterior wall interior plane; free of loose nails, wires, debris, dust, oil, and water |
| Standard eave and rake order | Check layer overlap direction at eaves, gable rakes, and lower corners | Eave drip edge goes under self-sealing membrane (membrane overlaps 6 inches at joints and covers top edge of drip edge); rake drip edge goes over underlayment |
| High-wind sealed-deck perimeter | Check dimensions, fastening, and flange seal where drip edge sits over membrane at eaves and rakes | Minimum 2 inches deck overlap, 1/2 inch below sheathing, 3 inches joint overlap, 4 inches maximum compatible fastener spacing, and flashing cement or ASTM D1970 peel-and-stick starter over eave flange |
| Fascia capillary clearance | Check the gap between the vertical lower leg of the drip edge and the fascia board | Do not press the lower leg touching the fascia; set the lower leg of the drip edge away from the fascia to prevent water wicking behind the flashing |
| Shingle starter strip alignment | Verify adhesive strip orientation, nail distance, corner lap, and overhang past the drip edge | Seal strip faces up toward eave or rake; standard overhang 1/4 to 3/4 inches (nailed 2 to 3 inches up from eave, 3 inches corner lap); high-wind eave overhang maximum 1/4 in. in an 8-in.-wide cement bed (1/8 in. max thick) |
| Gutter apron and drainage pitch | Confirm sheathing-to-fascia gap protection, gutter tuck behind drip edge apron, slope, and downspouts | 4-, 5-, or 6-inch K-style or U-style gutter tucked behind drip edge vertical leg; slope at least 1/16 inch per foot; 1 sq in. downspout per 100 sq ft roof area spaced 20 to 50 feet apart |
| Roof-to-wall gutter termination | Inspect lower sidewall intersections in heavy-rainfall climates | Kick-out diverter flashing integrated with wall house wrap to direct runoff into the gutter rather than down wall cladding |
| Metal roof eave and metals check | Verify underlayment sequence, flashing end laps, eave clips, sealant, and galvanic compatibility | Drip edge over 4-inch-wide taped seams + #30 felt/synthetic (or two-layer #30 felt); 4 inches minimum flashing end lap; sealant between metal roof and drip edge; smooth eave clips; no dissimilar metals |
Frequently Asked Questions
Why does drip edge go under underlayment at the eave but over underlayment at the rake?
Water flows downslope by gravity at the eave, so lapping the self-adhering membrane and underlayment over the eave drip edge flange lets water shed out over the metal without getting behind the flashing at the eave edge. Along sloped gable rakes, placing the rake drip edge over the underlayment keeps wind-driven rain from blowing under the side edge of the sheet.
Should the bottom of the drip edge touch the fascia board?
No—installing drip edge flashing with its lower leg touching the fascia can encourage capillary wicking of water behind the flashing and wet the fascia and sheathing edge. Installers should set the lower leg of the drip edge away from the fascia so runoff drops clear into the gutter or past the trim.
When can drip edge be installed on top of ice and water shield at the eave?
In high-wind zones using a sealed roof deck, metal drip edge may be installed over a fully adhered membrane underlayment at the eaves if compatible flashing cement seals the upper edge of the flashing, or if a shingle manufacturer-approved ASTM D1970 peel-and-stick starter strip adheres to and covers the top surface of the eave drip edge.
How far should asphalt shingles overhang the metal drip edge?
On standard asphalt shingle roofs, the starter strip should overhang 1/4 to 3/4 inches past the metal drip edge for drainage, with its self-adhesive seal strip facing up toward the eave or rake edge. Under high-wind specifications where drip edge sits over the underlayment at eaves, starter strips and shingles must not extend more than 1/4 inch beyond the drip edge.
Does the gutter go in front of or behind the drip edge?
The back edge of a residential gutter mounts on the fascia behind the vertical leg of the eave drip edge (unless the metal gutter uses an integral flashing piece designed to serve as the drip edge), closing the sheathing-to-fascia gap and directing roof runoff straight into the gutter channel sloped at least 1/16 inch per foot.
Sources
- Don’t Install Drip Edge Flashing With the Lower Leg Touching the Fascia, U.S. Department of Energy / Pacific Northwest National Laboratory Building America Solution Center
- Roof Eaves Sealed with Self-Adhering Membrane in Cold Climates, U.S. Department of Energy Building America Solution Center
- Drip Edge at Roof Eaves and Rakes, U.S. Department of Energy Building Science Education
- Roof Deck Sheathing and Sealing for Sloped Roofs, U.S. Department of Energy Building America Solution Center
- Asphalt Shingle Roofs, U.S. Department of Energy Building America Solution Center
- Metal Roofs, U.S. Department of Energy Building America Solution Center
- Gutters and Downspouts, U.S. Department of Energy Building America Solution Center
Related Engineering Guides
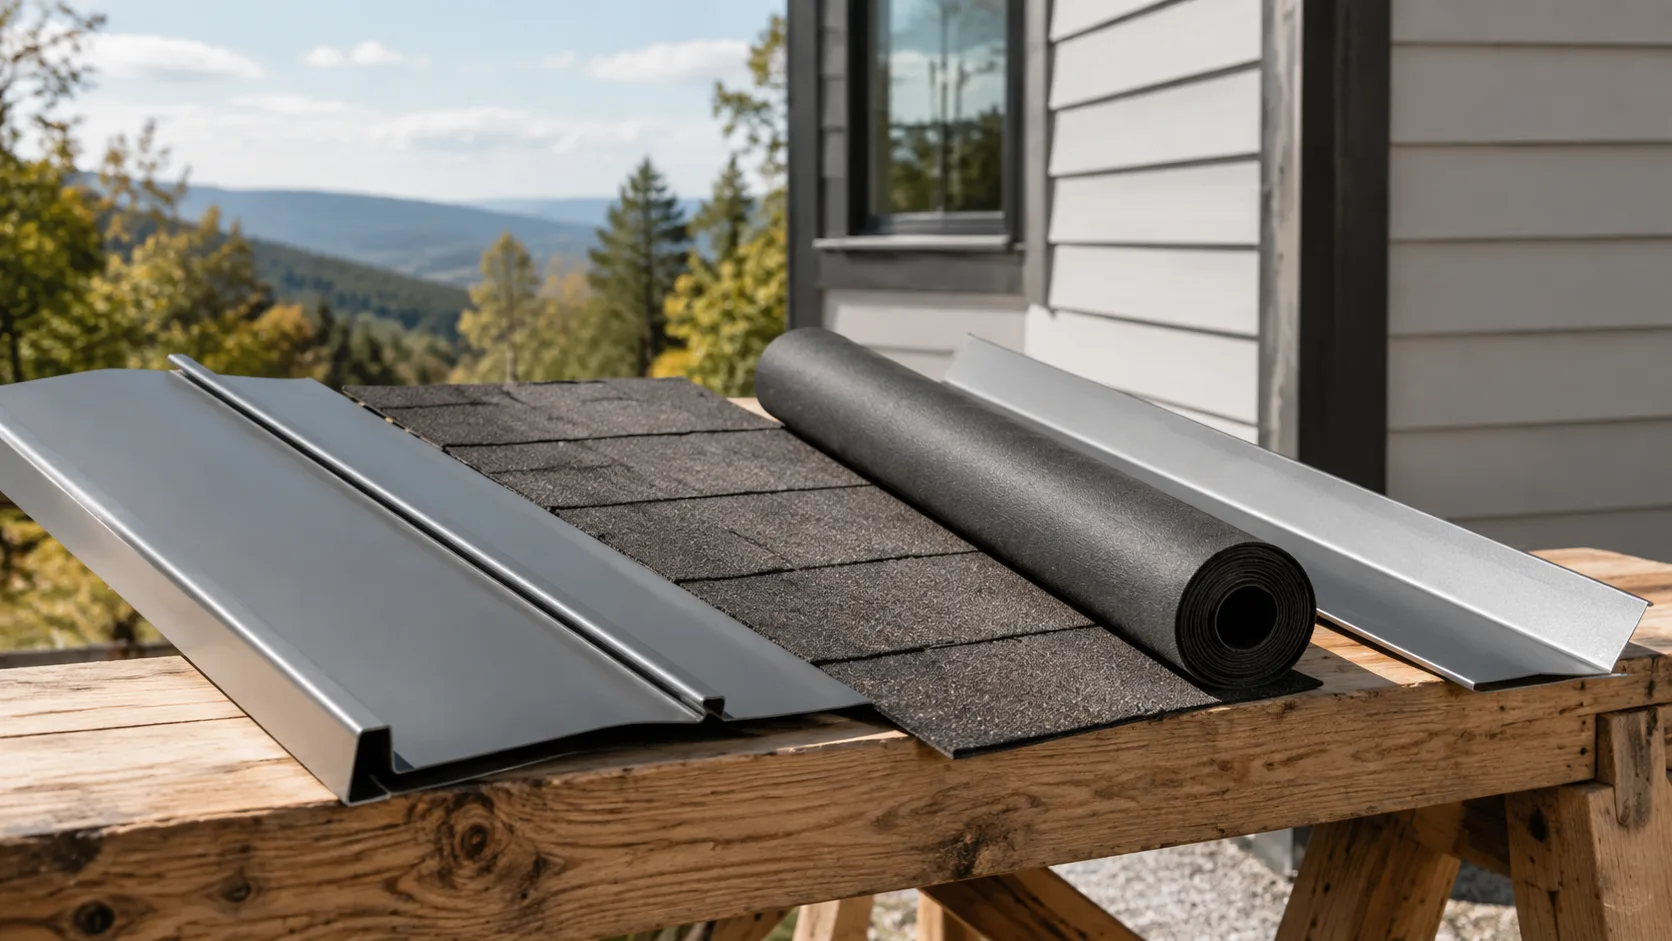
Exterior Siding and Roofing: Drainage, Cladding and Roof Details
Compare fiber-cement, metal and vinyl siding, roof coverings and the flashing connections that keep rain, air and moisture control continuous.
Read technical guide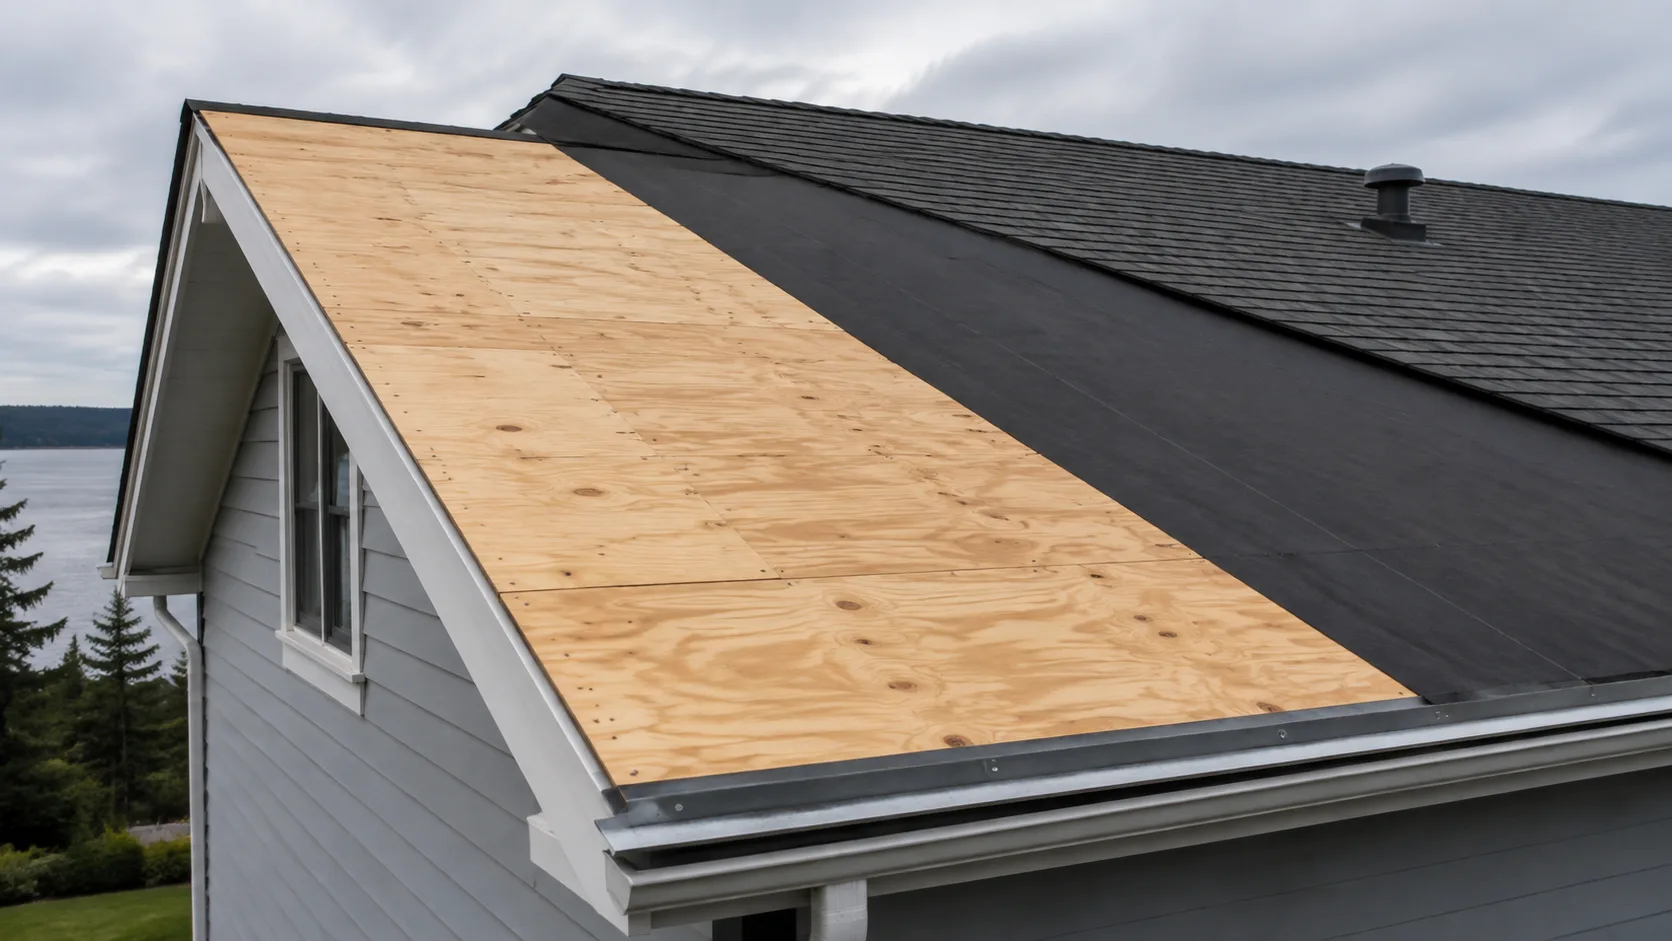
Ice and Water Shield: IRC Eave Coverage, Valleys and Product Selection
Apply the 2024 IRC ice-barrier scope and eave geometry, coordinate valley and drip-edge laps, and compare GRACE HT product conditions for the roof assembly.
Read technical guide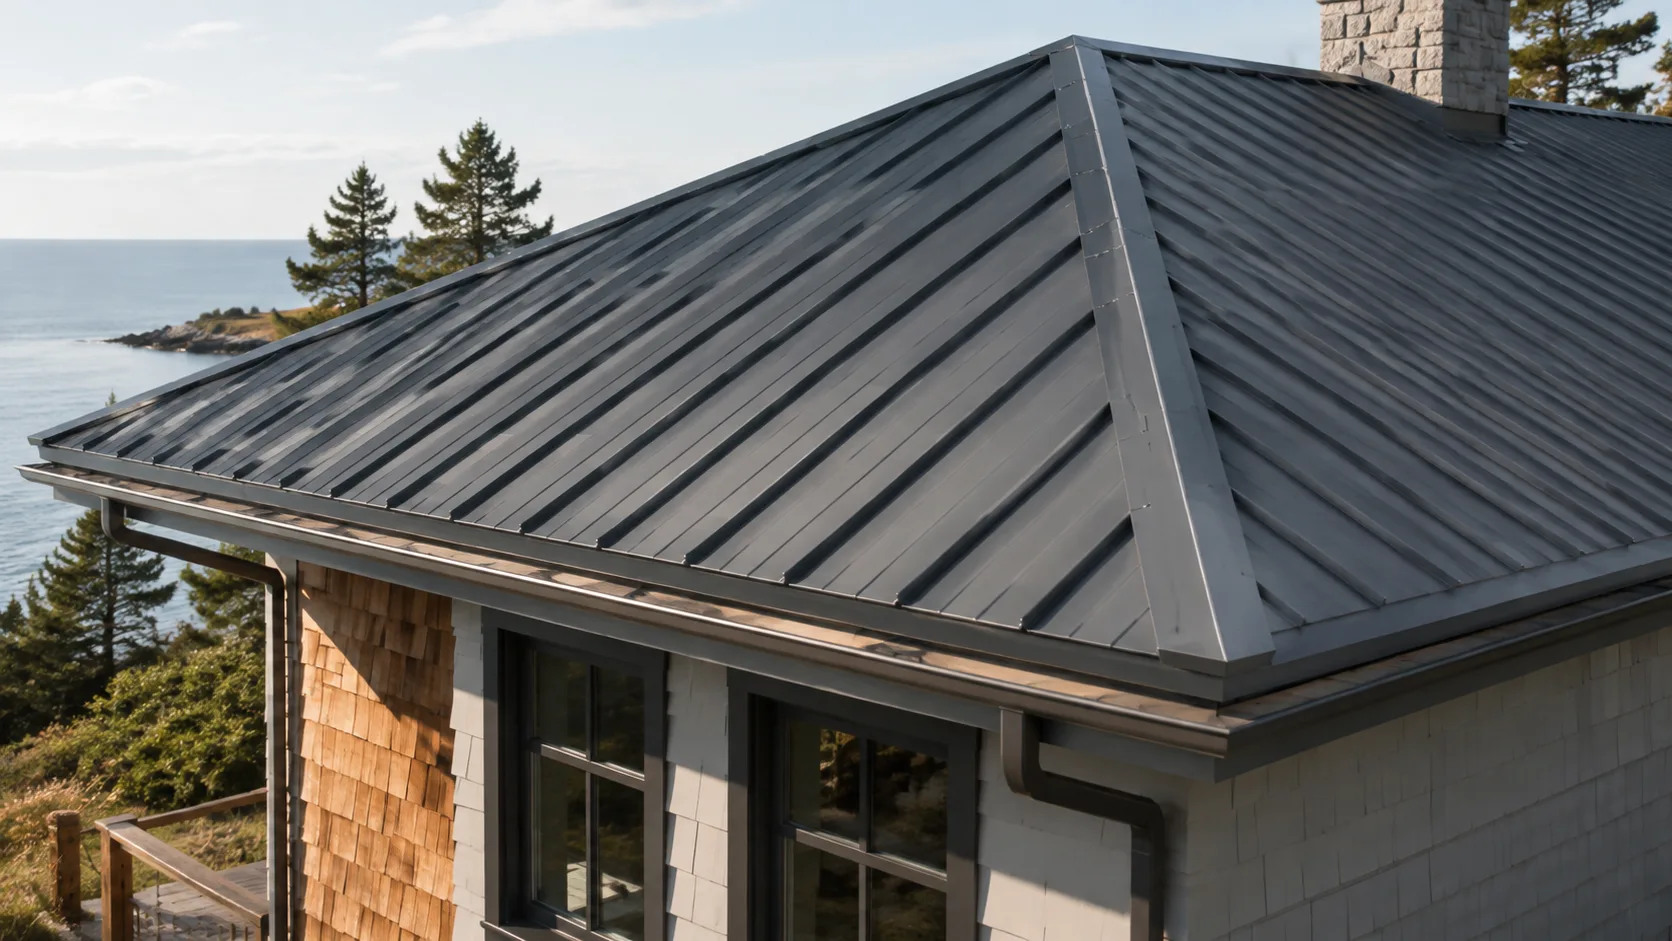
Standing Seam Metal Roof vs. Shingles: Wind, Service Life and Ownership Cost
Compare named metal and shingle specifications, attachment methods, wind-test conditions, warranties and a project-based 50-year ownership-cost framework.
Read technical guide